Using Maven to build Spark Job in Scala
Prerequired
Preinstalled Spark for cluster or stand alone mode.
Create Project and Maven Setup.
- Create an Maven Project.
- At the step of Select an Archtype, choose
maven-archtype-quickstart. Fill in the Group ID and Artifated ID as follows, and press Finish.

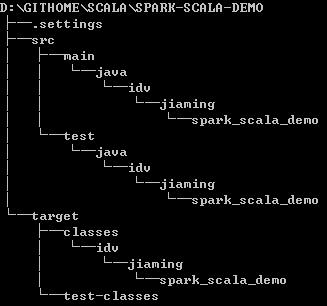
Scala IDE will help you to setup the Maven project. Initially the directories tree would looks like this...
- On the Scala IDE, add two folders named
scalaunder/src/mainand/src/testrespectively. The/src/main/scalais the main location we place the Scala source code and package. Add these two directories
/src/main/scalaand/src/test/scalato the Source Folder by right click on the/src/main/scalafolder, find Build Path then select Use as Source Folder. After you finish this step, you will have your project looks like this...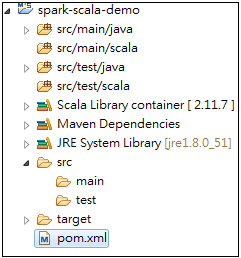
Edit the
pom.xmlfile.Open the file
pom.xml, and select the pom.xml tag.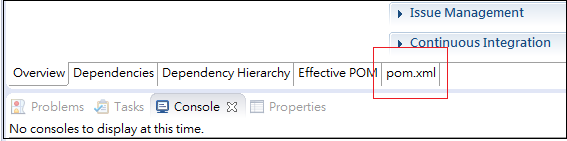
The file
pom.xmlis used to manage the libraries and plugins of project.<project xmlns="http://maven.apache.org/POM/4.0.0" xmlns:xsi="http://www.w3.org/2001/XMLSchema-instance" xsi:schemaLocation="http://maven.apache.org/POM/4.0.0 http://maven.apache.org/xsd/maven-4.0.0.xsd"> <modelVersion>4.0.0</modelVersion> <groupId>idv.jiaming</groupId> <artifactId>spark-scala-demo</artifactId> <version>0.0.1-SNAPSHOT</version> <packaging>jar</packaging> <name>spark-scala-demo</name> <url>http://maven.apache.org</url> <properties> <project.build.sourceEncoding>UTF-8</project.build.sourceEncoding> </properties> <dependencies> <dependency> <groupId>junit</groupId> <artifactId>junit</artifactId> <version>3.8.1</version> <scope>test</scope> </dependency> </dependencies> </project>The tag
dependenciesshows all the libraries you included into the project, Maven would download all those libraries and their dependencies automatically. In order to make the Maven to ompile and build the scala project, we have to add two plugins.- To add the Spark as dependency, insert the following dependency matadata to
dependenciessection.
Note that, for the reason of convenience, I specified the Spark version as 1.5.2. But the version should be same with your pre-installed Spark version.<dependency> <groupId>org.apache.spark</groupId> <artifactId>spark-core_2.11</artifactId> <version>1.5.2</version> </dependency> - Before adding plugins, insert a new section
<build></build>in the<project>section.<project xmlns=...> ... <dependencies> <dependency> ... </dependency> </dependencies> <build> </build> </project> - Adding two plugins in the
<build>section<build> <plugins> <plugin> ... </plugin> <plugin> ... </plugin> </plugins> </build> - Setitng the first plugin as following.
<plugin> <groupId>net.alchim31.maven</groupId> <artifactId>scala-maven-plugin</artifactId> <version>3.1.3</version> <executions> <execution> <goals> <goal>compile</goal> <goal>testCompile</goal> </goals> <configuration> <args> <arg>-make:transitive</arg> <arg>-dependencyfile</arg> <arg>${project.build.directory}/.scala_dependencies</arg> </args> </configuration> </execution> </executions> </plugin> - And the second plugin
 <plugin>
     <artifactId>maven-assembly-plugin</artifactId>
     <version>2.4.1</version>
     <configuration>
         <descriptorRefs>
             <descriptorRef>jar-with-dependencies</descriptorRef>
         </descriptorRefs>
     </configuration>
     <executions>
         <execution>
             <id>make-assembly</id>
             <phase>package</phase>
             <goals>
                 <goal>single</goal>
             </goals>
         </execution>
     </executions>
 </plugin>
To specify the source code path by adding the
<sourceDirectory>tag.<build> <sourceDirectory>src/main/scala</sourceDirectory> <plugins> ... </plugins> </build>The value of
<sourceDirectory>, which should be same with the source foldersrc/main/scalawe have just setup above. And note that, if setup with different source folder path, you should specify the value to your own path instead.(Optional) In the real project, it is common to contain the unit test code. For example, in this setup tutorial, we create a directory
src/main/testand set it as source folder. Also we have to specify the path inpom.xml.<build> <sourceDirectory>src/main/scala</sourceDirectory> <testSourceDirectory>src/test/scala</testSourceDirectory> <plugins> ... </plugins> </build>- Saving the change, Maven would start to pull all the dependencies and plugins from internet and build the project. This step takes times depende on the network bandwidth.
- After the dependencies pulling and project building finished, we are ready the write the first Spark in Scala program.
First Spark Application in Scala.
Now let's create an Spark application in Scala to estimate the value of Pi.
Creating a new package in
/src/main/scalaand specifying a package name.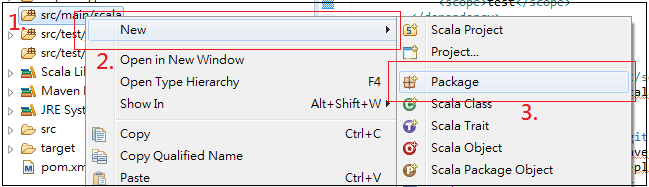
The first one step is right click on the source folder
/src/main/scalaSuppose that, I use the name
spark.practice1as my package name. We will see one empty packagespark.practice1in Eclipse Project Explore.
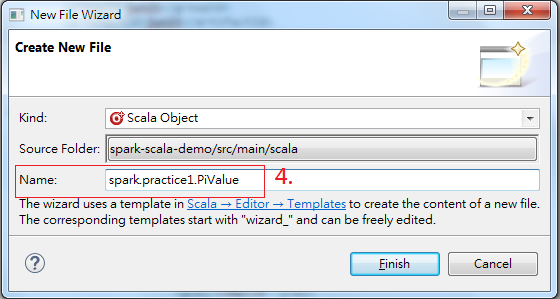
Creating a new Scala Object in package
spark.practice1which is namedPiValue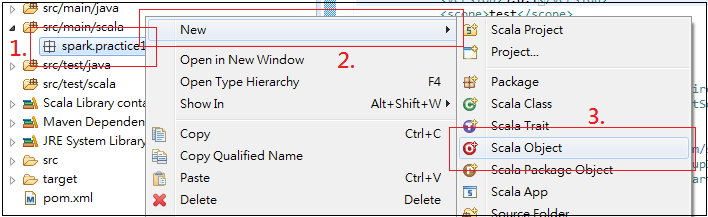
Analogues to the create package step, the first step is right click on package.
The initial content of Scala Object.
 package spark.practice1

 object PiValue {

 }
Writing an application to estimate Pi, copy and paste the following list.
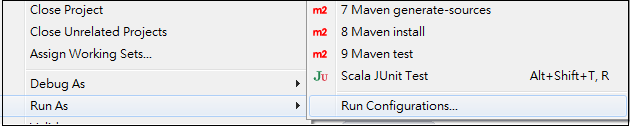
 package spark.practice1

 import org.apache.spark.SparkConf
 import org.apache.spark.SparkContext

 object PiValue {

 def main(arg: Array[String]) {

     val conf = new SparkConf().setAppName("PiValueEstimate").setMaster("local[2]")
     val sc = new SparkContext(conf)
     val NUM_SAMPLES = Integer.parseInt(arg(0))

     val count = sc.parallelize(1 to NUM_SAMPLES).map { i =>
         val x = Math.random()
         val y = Math.random()
         if (x * x + y * y < 1) 1 else 0
     }.reduce(_ + _)
     println("Pi is roughly " + 4.0 * count / NUM_SAMPLES)
   }
 }
Right click on the project name, and select Run As... on the menu, then select Run Configurations... to open a configure wizard.
The configuration wizard.
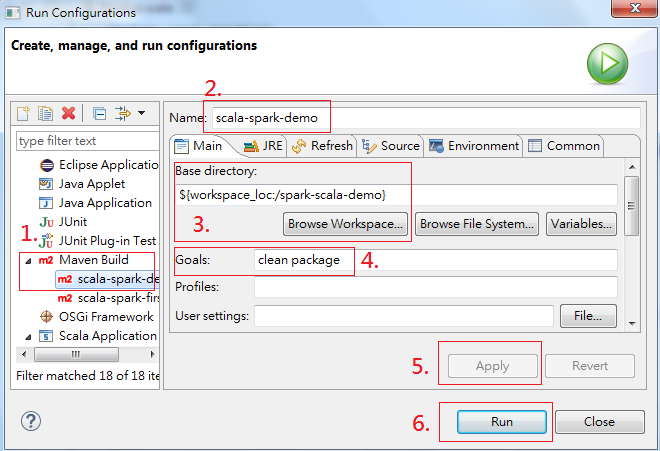
- New a Maven Build configuration.
- Specify the configuration name.
- Specify the project path, you can click the button Browse Workspace to list all the available projects.
- Specify the Maven functions. Now, we just fill
clean packageinto the text box. - Click the Apply button to save modifications.
- Click the Run button to run Maven Build.
The Maven Build messages would show in the Console, the first build would take more times since Maven has to grab dependencies on Internet.
- After you see the success message
The Maven will tell where to find the executable[INFO] --- maven-assembly-plugin:2.4.1:single (make-assembly) @ spark-scala-demo --- [INFO] Building jar: D:\GitHome\scala\spark-scala-demo\target\spark-scala-demo-0.0.1-SNAPSHOT-jar-with-dependencies.jar [INFO] ------------------------------------------------------------------------ [INFO] BUILD SUCCESS [INFO] ------------------------------------------------------------------------ [INFO] Total time: 01:00 min [INFO] Finished at: 2016-01-07T22:44:43+08:00 [INFO] Final Memory: 72M/619M [INFO] ------------------------------------------------------------------------jarfile, In this example, thejarfile is located atD:\GitHome\scala\spark-scala-demo\target\spark-scala-demo-0.0.1-SNAPSHOT-jar-with-dependencies.jar Open your terminal with the Spark Client installed, and using command to submit Spark Job
# spark-submit spark-scala-demo-0.0.1-SNAPSHOT-jar-with-dependencies.jar spark.practice1.PiValue 10000Where
spark.practice1.PiValuespecifies the path ofmainfunction,10000specifies the first input parameter ofmainfunction and it is also the samples number in the Pi calculations.Note that, we don't have to specify the execution mode since we have already specified in the application as
local[2].val conf = new SparkConf().setAppName("PiValueEstimate").setMaster("local[2]")